Pages

Showing posts with label HARDWARE. Show all posts

Wednesday, 31 October 2012

EDIT YOUR SYSTEM REGISTRY


Steps

  1. 1
    Go to the start menu to open run application launching window and then type regedit (then enter) to start the registry editing program. The registry editor should start.

Edit Background Information

How the Registry is stored

  1. 1
    In Windows 95, 98, and Me, the Registry is contained in two hidden files in your Windows directory, called USER.DAT and SYSTEM.DAT.
  2. 2
    In Windows 2000 and Windows XP, the Registry is stored in several Hives, located in the \windows\system32\config and \Documents and Settings\ {username} folders.

Structure of the Registry

  1. 1
    The Registry has a hierarchal structure, like the directories on your hard disk. Each branch (denoted by a folder icon in the Registry Editor, see below) is called a Key. Each key can contain other keys, as well as Values. Each value contains the actual information stored in the Registry. There are three types of values; String, Binary, and DWORD - the use of these depends upon the context.
  2. 2
    There are six main branches (five in Windows 2000 and Windows XP), each containing a specific portion of the information stored in the Registry. They are as follows:
    • HKEY_CLASSES_ROOT - this branch contains all of your file types as well as OLE information for all your OLE-aware applications.
    • HKEY_CURRENT_USER - this branch points to the part of HKEY_USERS appropriate for the current user.
    • HKEY_LOCAL_MACHINE - this branch contains information about all of the hardware and software installed on your computer. Since you can specify multiple hardware configurations, the current hardware configuration is specified in HKEY_CURRENT_CONFIG.
    • HKEY_USERS - this branch contains certain preferences (such as colors and control panel settings) for each of the users of the computer. In Windows 95/98/Me, the default branch here contains the currently-logged in user. In Windows 2000/XP, the default branch here contains a template to be used for newly-added users.
    • HKEY_CURRENT_CONFIG - this branch points to the part of HKEY_LOCAL_MACHINE appropriate for the current hardware configuration.
    • HKEY_DYN_DATA (Windows 95/98/Me only) - this branch points to the part of HKEY_LOCAL_MACHINE, for use with Windows' Plug-&-Play subsystem.

Using the Registry Editor

  1. 1
    The Registry Editor (regedit.exe) is included with Windows to enable you to view and edit the contents of the Registry. When you open the Registry Editor, you'll see a window divided into two panes. The left side shows a tree with folders (see Structure of the Registry above), and the right side shows the contents (values) of the currently selected folder (key).
    • To expand a certain branch, click on the little plus sign [+] to the left of any folder, or just double-click on the folder.
    • To display the contents of a key (folder), just click the desired key, and look at the values listed on the right side. You can add a new key or value by selecting New from the Edit menu. You can rename any value and almost any key with the same method used to rename files; right-click on an object and click rename, or click on it twice (slowly), or just press F2 on the keyboard. Lastly, you can delete a key or value by clicking on it, and pressing Delete on the keyboard, or by right-clicking on it, and choosing Delete.

Edit Possible Edits

Uninstall Programs Manually

  1. 1
    Just because Windows XP has the Add/Remove Programs feature it doesn't mean your application will appear in the list. Furthermore, even if it does appear, it's no guarantee that the uninstall feature will work. When you run across one of these situations the items listed below will help in getting rid of the application. Be aware that these steps may not remove everything associated with the application and can impact other applications on the computer. Have a backup or restore point and use caution.
  2. 2
    Find the directory for the application and delete all the files in the directory. Delete the directory.
  3. 3
    Open regedit and navigate to HKEY_LOCAL_MACHINE\SOFTWARE and find the folder for the application. Delete the folder.
  4. 4
    Open regedit and navigate to HKEY_CURRENT_USER\SOFTWARE and find the folder for the application. Delete the folder.
    • To remove the application entry from Add/Remove Programs (if present), open regedit and navigate to HKEY_LOCAL_MACHINE\SOFTWARE\Microsoft\Windows\CurrentVersion\Uninstall and find the folder for the application. Delete the folder.
    • Some applications have Services attached to them. If this is the case, navigate to HKEY_LOCAL_MACHINE\System\CurrentControlSet\Services, locate and delete the service.
  5. 5
    In Windows Explorer, navigate to the individual user settings and delete program references. Common places to check would be:
    • C:\Documents and Settings\All Users\Start Menu\Programs and delete relevant entries.
    • C:\Documents and Settings\All Users\Start Menu\Programs\Startup and delete relevant entries.
    • C:\Documents and Settings\%YourUserID%\Start Menu\Programs and delete relevant entries. [Do this for each User ID listed]
    • C:\Documents and Settings\%YourUserID%\Start Menu\Programs\Startup and delete relevant entries.[Do this for each User ID listed]
  6. 6
    If no entries were found in the previous step and the application launches automatically, navigate to

HKEY_CURRENT_USER\Software\Microsoft\Windows NT\CurrentVersion\Windows and delete the entry.

Move Location of History Folder

By default, History files (the URL to sites that you have visited, organized by day) are stored at in the folder %USERPROFILE%\Local Settings\History. You can redirect these files to any folder using the following Registry changes:
  • Hive: HKEY_CURRENT_USER
  • Key: Software\Microsoft\Windows\CurrentVersion\Explorer\UserShellFolders
  • Name: History
  • Data Type: REG_SZ
  • Value: path to new folder

Clear Pagefile on Shutdown

When Windows shuts down, it leaves the pagefile intact on the hard drive. Some programs may store sensitive information in clear text format in memory (which in turn may be paged out to disk). You may wish to empty this file for security reasons, or to help speed a boot time defrag, or because you dual boot, and you don't want to share the file, or just as part of troubleshooting a problem. Making the following registry change (or create the following entry) will clear your page file when rebooting.
  • Hive: HKEY_LOCAL_MACHINE
  • Key: SYSTEM\CurrentControlSet\Control\Session Manager\Memory Management
  • Name: ClearPageFileAtShutdown
  • Data Type: REG_DWORD
  • Value: 1

Disable Changing Passwords

If, for some reason, you decided that you didn't want users of a Windows 2000 computer to be able to change their password unless prompted to, you can make this Registry change to implement that:
  • Hive: HKEY_CURRENT_USER
  • Key: Software\Microsoft\Windows\CurrentVersion\Policies\System
  • Name: DisableChangePassword
  • Data Type: REG_DWORD
  • Value: 1
A value of 0 means they can change their password whenever they want to. A value of 1 means that users will not be able to change their password unless prompted (by the password expiring, or by the box next to "User Must Change Password at Next Logon" being checked). Please use caution and frequent backups when working with the Registry.

Get Rid of Shared Documents

New to Windows XP is a "Shared Documents" folder that appears in My Computer. This is really just a pointer to another area on disk. You can keep this from appearing by deleting the following Subkey from the Registry:
  • Hive: HKEY_LOCAL_MACHINE
  • Key: SOFTWARE\Microsoft\Windows\CurrentVersion\Explorer\My
  • Computer\NameSpace\DelegateFolders
  • Subkey: {59031a47-3f72- 44a7-89c5-5595fe6b30ee}
  • Delete the whole Subkey and all that it contains.
You may wish to right-click this Subkey and export it before deleting it, just to be safe. This also will prevent the current users "My Documents" from showing up in the same area of My Computer. Use caution and frequent backups when editing the Registry.

Model your explorer toolbars

This helps you add an image to the background of your explorer toolbar. To do this go to HKEY_CURRENT_USER\Software\Microsoft\Internet Explorer\toolbar and add a new string value named? BackBitmapShell? (Without quotes) to it and set its value to the path of the image file. Tip #595: Add a background bitmap to the Internet Explorer toolbar One can easily add a bitmap to the Internet Explorer toolbar. Go to HKEY_CURRENT_USER\Software\Microsoft\Internet Explorer\Toolbar and create a new string value named? BackBitmapIE5? (For Internet Explorer 5) and set the path of the bitmap as it value.

Show a Recycle Bin in your My Computer

  • Hive: HKEY_LOCAL_MACHINE
  • Key: SOFTWARE\Microsoft\Windows\CurrentVersion\Explorer\My
  • Computer\NameSpace
  • In NameSpace create a New Key & named it as {645FF040-5081-101B-9F08-
  • 00AA002F954E}
  • Now in Right pane make a value Default to “Recycle Bin” without Quotes.
  • Refresh a comp or Restart a comp to effect a change that u have made  
    1. Attributes
  • 70 01 00 20? Adds both rename and delete to the menu
  • 50 01 00 20? Adds only rename option to the menu
  • 60 01 00 20? Adds only delete to the menu
  • 47 01 00 20? Adds cut, copy, paste to the menu
  • 40 01 00 20? Changes the menu to its default condition

Shutdown XP Faster

When a user shuts down Windows XP, first the system has to kill all services currently running. Every once in a while the service does not shut down instantly and windows give it a change to shut down on its own before it kills it. This amount of time that windows wait is stored in the system registry. If you modify this setting, then windows will kill the service earlier. To modify the setting, follow the directions below:
  • Start Regedit.
  • Navigate to HKEY_LOCAL_MACHINE/SYSTEM/CurrentControlSet/Control.
  • Click on the "Control" Folder.
  • Select "WaitToKillServiceTimeout"
  • Right click on it and select Modify.
  • Set it a value lower than 2000 (Mine is set to 200).
  • Or
  • Like previous versions of windows, it takes long time to restart or shutdown windows
xp when the "Exit Windows" sound is enabled. To solve this problem you must disable this useless sound. Click start button then go to settings -> control panel -> Sound, Speech and Audio devices -> Sounds and Audio Devices -> Sounds, then under program events and windows menu click on "Exit Windows" sub-menu and highlight it. Now from sounds you can select, choose "none" and then click apply and ok. Now you can see some improvements when shutting down your system.

Display message on startup XP

If you would like to display a legal message or any other message in a pop-up window when windows starts read below:
  • Start Regedit; if you are unfamiliar with Regedit please see our FAQ.
  • Navigate to HKEY_LOCAL_MACHINE/SOFTWARE/Microsoft/Windows
  • NT/CurrentVersion/Winlogon.
  • Modify the key “legalnoticecaption” with what you want to name the window.
  • Modify the key “legalnoticetext” with what you want the window to say.
  • Restart.

Change a name of Microsoft Internet Explorer

  • Hive: HKEY_CURRENT_USER
  • Key: Software\Microsoft\Internet Explorer\Main
  • Name: Window Title
  • Data Type: REG_SZ
  • Value: Text
  • Whatever text you enter in for the value will appear in the title of the IE Window.
  • Note: I have only checked this in IE 5.x and 6.x.

Edit Warnings

  • Editing the registry can be very dangerous, and can cause permanent damage to your system!
  • Write down the your changes and initial values. You may need to restore the registry as it was.
  • Registry editing may not be possible in some Windows versions.
  • A few words about clearing the pagefile on shutdown. Doing this has no performance benefits whatsoever. This does not delete the file but overwrites every byte with zero's. A boot time defrag will not be sped up by doing this. Clearing the pagefile is sometimes done as a security measure. But unless it is a part of a well thought out security policy it will avail you little. There are many other ways to obtain access to sensitive data and most of them require less effort. It should also be noted that this will considerably lengthen shutdown times.

Friday, 19 October 2012

Clean Your RAM Using Notepad


How To Clean Your RAM Using Notepad

without using any software


>First open notepad

>Type FreeMem=Space(10240000000)

>Save it as CLEANER.VBS in any location you like.

>You can edit the code and write 512 instead of 1024 if you own a 512mb RAM or change to anything you like.

>Then run it !

Friday, 12 October 2012

COMPUTER QUIZ

COMPUTER QUIZ
(To see correct answers, move mouse over options, answer will be highlighted)
1. Which of the following communication mode supports data transmission in
    both directions at the same time?   
  
    a) Simplex
    b) Duplex
    c) Half simplex
    d) Full duplex
    e) Multiplex

2. Which of the following transmission techniques let computer to
    alternatively send and receive data?

    a) Duplex
    b) Simplex
    c) Half duplex
    d) Full duplex
    e) None of above

3.  Modulation is the process of :
     a) Echoing every character that is received
     b) Converting digital signals to analog signals
     c) Converting analog signals to digital signals
     d) Sending a file from one computer to another computer
     e) None of above

4. A modem performs-
    a) Modulation
    b) Demodulation
    c) Data compression
    d) Both (a) & (b) 
    e) All (a), (b) & (c)

5. Which of the following keyboard format is most commonly used?
    a) TWRITER
    b) SPLITTER
    c) QWERTY
    d) Dvorak
    e) None of the above

6. The function of key F4 in a word processing application is -
    a) to repeat the last action
    b) to open a saved document
    c) to delete the highlighted text
    d) to open context menu of highlighted text
    e) None of above

7. Laser printer is an example of -
    a) Impact printer
    b) Inkjet printer
    c) Non-Impact printer
    d) Dot-matrix printer
    e) None of above

8. which of the following is a term related with scanners?
    a) Laser
    b) TWAIN
    c) QWERTY
    d) Media
    e) Cartridge

9. The resolution of a monitor depends on:
    a) Dot pitch of the monitor
    b) Number of bits representing a pixel
    c) Number of pixels that can be displayed
    d) Both (a) & (b)
    e) All (a), (b) & (c)

10. What does the term ISO stands for?
    a) Information System Output
    b) International Standards Organization
    c) International Systems organization
    d) Integrated Services Organization
    e) None of above

Sunday, 2 September 2012

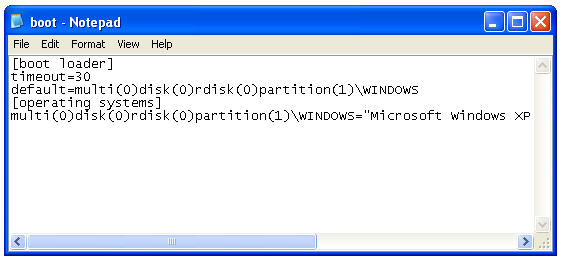
BOOT.INI


Windows (specifically Ntldr) uses the Boot.ini file to determine which operating system options to display when the Startup program is running. By default, Boot.ini is not flagged as a read-only system file and generally does not require any manual modification.

If you must change the contents of this file, use the System tool in Control Panel:
  1. Click Start button, click Control Panel, and then double-click System.
  2. Click the Advanced tab, and then click Settings under Startup and Recovery.
Typically, the Boot.ini file contains the following data:
[boot loader]
timeout=30
default=scsi(0)disk(0)rdisk(0)partition(1)\winnt
[operating systems]
scsi(0)disk(0)rdisk(0)partition(1)\winnt = "Windows NT" /NODEBUG C:\ = "Previous Operating System on C:\"
The following list describes the meaning of the data in the Boot.ini file:
  • The "timeout" variable specifies how long Windows waits before choosing the default operating system.
  • The "default" variable specifies the default operating system.
  • The term "scsi(0)" means that the primary controller (that is frequently the only controller) is responsible for the device. If there are two SCSI controllers, and the disk is associated with the second controller, the controller is named "scsi(1)".

    If the system uses IDE, enhanced IDE (EIDE), or Enhanced Small Device Interface (ESDI) drives, or if the system uses a SCSI adapter that does not have a built-in BIOS, replace "scsi" with "multi".
  • The term "disk(0)" refers to the SCSI logical unit (LUN) to use. This may be a separate disk, but most SCSI setups have only one LUN for each SCSI ID.
  • The term "rdisk(0)" refers to physical disk 1.
  • The term "partition(1)" is the partition on the first drive in the computer. If there are two partitions, partition C is partition(1) and partition D is partition(2).
  • A multi-boot parameter calls for checking the Winnt folder to start from a specified SCSI controller's disk and partition.
  • "/NODEBUG" specifies that no debugging information is being monitored. Debugging information is useful only for developers.
  • You can add the /SOS option to display driver names while the drivers are being loaded. By default, the OS Loader screen only shows progress dots.
  • "Previous Operating System on C:\" implies that the "previous operating system" is MS-DOS, because "C:\" is an MS-DOS path.

NTLDR


NTLDR 

(abbreviation of NT loader) is the boot loader for all releases ofWindows NT operating system up to and including Windows XP andWindows Server 2003. NTLDR is typically run from the primary hard disk drive, but it can also run from portable storage devices such as aCD-ROM, USB flash drive, or floppy disk. NTLDR can also load a non NT-based operating system given the appropriate boot sector in a file.
NTLDR requires, at the minimum, the following two files to be on thesystem volume:
  • ntldr, the main boot loader itself
  • NTDETECT.COM, required for booting an NT-based OS, detects basic hardware information needed for successful boot
An additional important file is boot.ini, which contains boot configuration (if missing, NTLDR will default to \Windows on the first partition of the first hard drive).
NTLDR is launched by the volume boot record of system partition, which is typically written to the disk by the Windows FORMAT or SYScommand.

Sunday, 22 July 2012

List of F1-F9 Key Cmds 4 cmd prompt


List of F1-F9 Key Cmds 4 cmd prompt


List of F1-F9 Key Commands for the Command Prompt
F1 / right arrow: Repeats the letters of the last command line, one by one.
F2: Displays a dialog asking user to "enter the char to copy up to" of the last command line
F3: Repeats the last command line
F4: Displays a dialog asking user to "enter the char to delete up to" of the last command line
F5: Goes back one command line
F6: Enters the traditional CTRL+Z (^z)
F7: Displays a menu with the command line history
F8: Cycles back through previous command lines (beginning with most recent)
F9: Displays a dialog asking user to enter a command number, where 0 is for first command line entered.
Alt+Enter: toggle full Screen mode.
up/down: scroll thru/repeat previous entries
Esc: delete line
Note: The buffer allows a maximum of 50 command lines. After this number is reached, the first line will be replaced in sequence.
Helpful accessibility keyboard shortcuts
Switch FilterKeys on and off. Right SHIFT for eight seconds
Switch High Contrast on and off. Left ALT +left SHIFT +PRINT SCREEN
Switch MouseKeys on and off. Left ALT +left SHIFT +NUM LOCK
Switch StickyKeys on and off. SHIFT five times
Switch ToggleKeys on and off. NUM LOCK for five seconds

Gmail Shortcuts


Gmail
Note: Must have "keyboard shortcuts" on in settings.
C: Compose new message.
Shift + C: Open new window to compose new message.
Slash (/): Switch focus to search box.
K: Switch focus to the next most recent email. Enter or "O" opens focused email.
J: Switch focus to the next oldest email.
N: Switch focus to the next message in the "conversation." Enter or "O" expands/collapses messages.
P: Switch focus to the previous message.
U: Takes you back to the inbox and checks for new mail.
Y: Various actions depending on current view:
Has no effect in "Sent" and "All Mail" views.
Inbox: Archive email or message.
Starred: Unstar email or message.
Spam: Unmark as spam and move back to "Inbox."
Trash: Move back to "Inbox."
Any label: Remove the label.
X: "Check" an email. Various actions can be performed against all checked emails.
S: "Star" an email. Identical to the more familiar term, "flagging."
R: Reply to the email.
A: Reply to all recipients of the email.
F: Forward an email.
Shift + R: Reply to the email in a new window.
Shift + A: Reply to all recipients of the email in a new window.
Shift + F: Forward an email in a new window.
Shift + 1 (!): Mark an email as spam and remove it from the inbox.
G then I: Switch to "Inbox" view.
G then S: Switch to "Starred" view.
G then A: Switch to "All Mail" view.
G then C: Switch to "Contacts" view.
G then S: Switch to "Drafts" view.

Mozilla Firefox Shortcuts


Mozilla Firefox Shortcuts
Ctrl + Tab or Ctrl + PageDown: Cycle through tabs.
Ctrl + Shift + Tab or Ctrl + PageUp: Cycle through tabs in reverse.
Ctrl + (1-9): Switch to tab corresponding to number.
Ctrl + N: New window.
Ctrl + T: New tab.
Ctrl + L or Alt + D or F6: Switch focus to location bar.
Ctrl + Enter: Open location in new tab.
Shift + Enter: Open location in new window.
Ctrl + K or Ctrl + E: Switch focus to search bar.
Ctrl + O: Open a local file.
Ctrl + W: Close tab, or window if there's only one tab open.
Ctrl + Shift + W: Close window.
Ctrl + S: Save page as a local file.
Ctrl + P: Print page.
Ctrl + F or F3: Open find toolbar.
Ctrl + G or F3: Find next...
Ctrl + Shift + G or Shift + F3: Find previous...
Ctrl + B or Ctrl + I: Open Bookmarks sidebar.
Ctrl + H: Open History sidebar.
Escape: Stop loading page.
Ctrl + R or F5: Reload current page.
Ctrl + Shift + R or Ctrl + F5: Reload current page; bypass cache.
Ctrl + U: View page source.
Ctrl + D: Bookmark current page.
Ctrl + NumpadPlus or Ctrl + Equals (+/=): Increase text size.
Ctrl + NumpadMinus or Ctrl + Minus: Decrease text size.
Ctrl + Numpad0 or Ctrl + 0: Set text size to default.
Alt + Left or Backspace: Back.
Alt + Right or Shift + Backspace: Forward.
Alt + Home: Open home page.
Ctrl + M: Open new message in integrated mail client.
Ctrl + J: Open Downloads dialog.
F6: Switch to next frame. You must have selected something on the page already, e.g. by use of Tab.
Shift + F6: Switch to previous frame.
Apostrophe ('): Find link as you type.
Slash (/): Find text as you type.

Remote Desktop Connection Navigation
Ctrl + Alt + End: Open the NT Security dialog.
Alt + PageUp: Switch between programs.
Alt + PageDown: Switch between programs in reverse.
Alt + Insert: Cycle through the programs in most recently used order.
Alt + Home: Display start menu.
Ctrl + Alt + Break: Switch the client computer between a window and a full screen.
Alt + Delete: Display the Windows menu.
Ctrl + Alt + NumpadMinus: Place a snapshot of the entire client window area on theTerminal server clipboard and provide the same functionality as pressing Alt + PrintScreen on a local computer.
Ctrl + Alt + NumpadPlus: Place a snapshot of the active window in the client on theTerminal server clipboard and provide the same functionality as pressing PrintScreen on a local computer.

Accessibility


Accessibility
Right Shift for eight seconds: Toggle FilterKeys on and off. FilterKeys must be enabled.
Left Alt + Left Shift + PrintScreen: Toggle High Contrast on and off. High Contrast must be enabled.
Left Alt + Left Shift + NumLock: Toggle MouseKeys on and off. MouseKeys must be enabled.
NumLock for five seconds: Toggle ToggleKeys on and off. ToggleKeys must be enabled.
Shift five times: Toggle StickyKeys on and off. StickyKeys must be enabled.
6.) Microsoft Natural Keyboard with IntelliType Software Installed
Win + L: Log off Windows.
Win + P: Open Print Manager.
Win + C: Open control panel.
Win + V: Open clipboard.
Win + K: Open keyboard properties.
Win + I: Open mouse properties.
Win + A: Open Accessibility properties.
Win + Space: Displays the list of Microsoft IntelliType shortcut keys.
Win + S: Toggle CapsLock on and off.

Generic
Ctrl + C or Ctrl + Insert: Copy.
Ctrl + X or Shift + Delete: Cut.
Ctrl + V or Shift + Insert: Paste/Move.
Ctrl + N: New... File, Tab, Entry, etc.
Ctrl + S: Save.
Ctrl + O: Open...
Ctrl + P: Print.
Ctrl + Z: Undo.
Ctrl + A: Select all.
Ctrl + F: Find...
Ctrl+W : to close the current window
Ctrl + F4: Close tab or child window.
F1: Open help.
F11: Toggle full screen mode.
Alt or F10: Activate menu bar.
Alt + Space: Display system menu. Same as clicking the icon on the titlebar.
Escape: Remove focus from current control/menu, or close dialog box.
Generic Navigation
Tab: Forward one item.
Shift + Tab: Backward one item.
Ctrl + Tab: Cycle through tabs/child windows.
Ctrl + Shift + Tab: Cycle backwards through tabs/child windows.
Enter: If a button's selected, click it, otherwise, click default button.
Space: Toggle items such as radio buttons or checkboxes.
Alt + (Letter): Activate item corresponding to (Letter). (Letter) is the underlined letter on the item's name.
Ctrl + Left: Move cursor to the beginning of previous word.
Ctrl + Right: Move cursor to the beginning of next word.
Ctrl + Up: Move cursor to beginning of previous paragraph. This and all subsequent Up/Down hotkeys in this section have only been known to work in Rich Edit controls.
Ctrl + Down: Move cursor to beginning of next paragraph.
Shift + Left: Highlight one character to the left.
Shift + Right: Highlight one character to the right.
Shift + Up: Highlight from current cursor position, to one line up.
Shift + Down: Highlight from current cursor position, to one line down.
Ctrl + Shift + Left: Highlight to beginning of previous word.
Ctrl + Shift + Right: Highlight to beginning of next word.
Ctrl + Shift + Up: Highlight to beginning of previous paragraph.
Ctrl + Shift + Down: Highlight to beginning of next paragraph.
Home: Move cursor to top of a scrollable control.
End: Move cursor to bottom of a scrollable control.
Generic File Browser
Arrow Keys: Navigate.
Shift + Arrow Keys: Select multiple items.
Ctrl + Arrow Keys: Change focus without changing selection. "Focus" is the object that will run on Enter. Space toggles selection of the focused item.
(Letter): Select first found item that begins with (Letter).
BackSpace: Go up one level to the parent directory.
Alt + Left: Go back one folder.
Alt + Right: Go forward one folder.
Enter: Activate (Double-click) selected item(s).
Alt + Enter: View properties for selected item.
F2: Rename selected item(s).
Ctrl + NumpadPlus: In a Details view, resizes all columns to fit the longest item in each one.
Delete: Delete selected item(s).
Shift + Delete: Delete selected item(s); bypass Recycle Bin.
Ctrl while dragging item(s): Copy.
Ctrl + Shift while dragging item(s): Create shortcut(s).

In tree pane, if any:
Left: Collapse the current selection if expanded, or select the parent folder.
Right: Expand the current selection if collapsed, or select the first subfolder.
Numpad Asterisk: Expand currently selected directory and all subdirectories. No undo.
Numpad Plus: Expand currently selected directory.
Numpad Minus: Collapse currently selected directory.

Windows Hotkeys


Windows Hotkeys
Shift + F10 right-clicks.
Win + L (XP Only): Locks keyboard. Similar to Lock Workstation.
Win + F or F3: Open Find dialog. (All Files) F3 may not work in some applications which use F3 for their own find dialogs.
Win + Control + F: Open Find dialog. (Computers)
Win + U: Open Utility Manager.
Win + F1: Open Windows help.
Win + Pause: Open System Properties dialog.
Win + Tab: Cycle through taskbar buttons. Enter clicks, AppsKey or Shift + F10 right-clicks.
Win + Shift + Tab: Cycle through taskbar buttons in reverse.
Alt + Tab: Display Cool Switch. More commonly known as the AltTab dialog.
Alt + Shift + Tab: Display Cool Switch; go in reverse.
Alt + Escape: Send active window to the bottom of the z-order.
Alt + Shift + Escape: Activate the window at the bottom of the z-order.
Alt + F4: Close active window; or, if all windows are closed, open shutdown dialog.
Shift while a CD is loading: Bypass AutoPlay.
Shift while login: Bypass startup folder. Only those applications will be ignored which are in the startup folder, not those started from the registry (Microsoft\Windows\CurrentVersion\Run\)
Ctrl + Alt + Delete or Ctrl + Alt + NumpadDel (Both NumLock states): Invoke the Task Manager or NT Security dialog.
Ctrl + Shift + Escape (2000/XP ) or (Ctrl + Alt + NumpadDot) : Invoke the task manager. On earlier OSes, acts like Ctrl + Escape.
Print screen: Copy screenshot of current screen to clipboard.
Alt + Print screen: Copy screenshot of current active window to clipboard.
Ctrl + Alt + Down Arrow: Invert screen. Untested on OS's other than XP.
Ctrl + Alt + Up Arrow: Undo inversion.
Win + B : Move focus to systray icons.